Chart Controls
The Controls
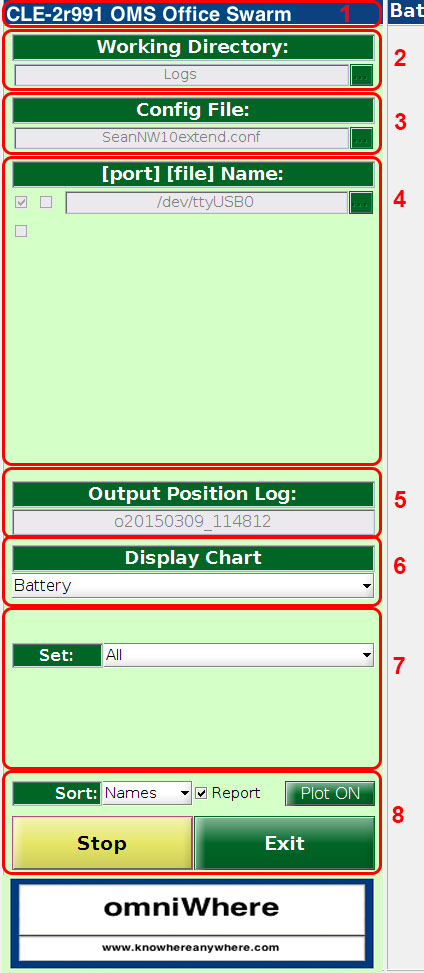
The Charts and Graphs screen (Main tab) is used to view and monitor real-time operation of the system. The controls are located on the left of the screen and they are used to select and control what is displayed on the right in the main graphics chart area.
System Information
The fields labelled 1 to 5 on the right are System Information.
Chart Controls
The fields labelled 6, 7 and 8 on the right are the Chart Controls:
Display Chart (6)
This drop-down is used to select which Chart is to be displayed in the main window on the right. In the illustration the Battery chart is selected.
Display controls that vary by Chart (7)
This section provides a range of different controls over what information is displayed on the real-time chart. The controls available vary depending on the type of chart shown. In the case of the Battery chart (selected in the illustration), only the "Set" control is available. The individual chart controls are described under the charts for which they are applicable.
Display and Run controls (8)
The top row of this section is for chart display controls that are applicable to all charts and graphs. The following fields are defined:
- "Sort" sets the sort order in which physical devices are shown in the charts and graphs. In the illustration sort order is by Name - these are the user definable names associated with each device (see Devices Configuration). The alternative sort order is by ID - this is the unique ID associated with each physical device.
- "Report" is a simple tick box which is on by default. When On only devices flagged as reportable (see Devices Configuration) are included in the charts and plots. When turned off (unticked) all devices including those marked as not reportable are included.
- "Plot On" says that live real-time data plotting is enabled. It can be turned off by clicking the button. This freezes the display at the time it is clicked. Clicking it again resumes normal live data plotting.
The Stop/Start button is used to start and stop the application. On the whereBox it is started automatically. When running the left button says "Stop" and is coloured yellow to indicate that the application is running. These buttons should not be used on the whereBox.
Defaults on CLS
On the whereBox the omniWhere application is started automatically with the working directory, configuration file, input data sources and output log locations all set according to the database structures used on the whereBox.
Once started and running they are greyed out and cannot be changed by the user without first stopping the application.
When running on the whereBox, the user is discouraged from changing these settings manually because this could lead to inconsistent operation. Their main use is for stand-alone omniWhere use (such as in demonstration systems and for development).
knowhere anywhere

3rd Floor, St Andrew's House, 59 St Andrew's Street, Cambridge, CB2 3BZ, UK
tel: +44 1223 651390, email: info@omnisense.co.uk
Copyright © 2016, Omnisense Ltd